Aviation and aerospace are the earliest fields of CNC machine tools, and they are still the most important part of the CNC machine tool user group, especially in high-end CNC applications. However, it is undeniable that in the use of machine tools by many users, including expensive imported machine tools, the benefits are not fully utilized. Among them, there are some common reasons that all CNC users encounter, as well as the special characteristics of aviation and aerospace workpieces.
Aerospace and aerospace workpieces are often machined from large pieces of aluminum into thin-walled parts, as well as some welded structural parts. Therefore, the processing of aerospace and aerospace parts needs to solve the problem of workpiece alignment and deformation compensation during processing. Marposs' on-machine inspection technology can solve such machining difficulties very well. Founded in 1952, the Italian company Marposs has been providing electronic measuring systems for use in workshop conditions for more than half a century and is a global leader in inspections. Marposs is known for its active measuring instruments and pneumatic measuring instruments. It is also a well-known probe manufacturer. Many famous machine tool factories in the world use the Marposs Mida probes, which are widely used for workpiece alignment and tool setting. measuring.
The Marposs E86 radio probe is used on large machine tools to avoid the inability of the infrared probe to be blocked or to be triggered by false triggers, especially for 5-axis machines with a oscillating head. The E86 probe is available in both integral and modular configurations. The TL25G probe for thin-walled parts and curved surfaces can be used when needed, coupled with the E86N radio transmitter module, which is ideal for aerospace and aerospace CNC machining applications.
The probe is like a knife. It is usually placed in the magazine. It is called up before processing. It automatically measures the corresponding position of the workpiece, sets the coordinate origin, and even the part is placed. After the probe is measured, it is rotated by the coordinate system of the CNC system. The function is automatically corrected and no human intervention is required. This eliminates the need for manual positioning and correction. For irregular parts, manual alignment is difficult to perform, and automatic alignment with the probe is an irreplaceable advantage. At the same time, at the same time, the blank margin can be obtained, and the variable allowance can be used to realize the automatic distribution of the blank margin, so that the cutting force can be prevented from being too large, the machine tool and the tool can be damaged, and the cutting can be performed with maximum efficiency.
The amount of deformation can be measured before finishing, the necessary compensation can be made, and the optimum amount of cutting can be determined. After the inspection, the inspection is carried out, and then it is removed from the machine tool after the guarantee is passed, so as to avoid the over-poor after the removal, and the secondary loading causes the waste. For aerospace and aerospace valuable parts, it is necessary to ensure that each piece and the first piece are qualified.
Some machine tools are now equipped with probes, but due to inadequate training or inefficient programming, the application of different CNC systems in the workshop makes manual testing procedures a complicated task.
Over the years, the majority of users hope to get rid of the troubles of manual programming, like CAD instead of hand-drawing, CAM instead of manual programming, can also use the computer to automatically program the test. Now Marpos officially launched 3DSI 3D on-machine detection software to solve this problem that has long plagued users.
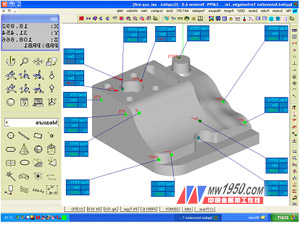
3DSI software is a programming platform running on a microcomputer. It can transfer a variety of CAD models, and use the graphical interface or mouse to directly take measurements on the model. Various geometric measurements such as cylinders, cones, balls, and parallels can be performed. Measurements such as degrees, verticality, and curved surfaces that are difficult to manually edit; can be simulated in a computer to perform interference and collision inspection; corresponding detection procedures can be generated according to different numerical control systems; various forms of reports can be generated.

Figure 1 Marposs 3DSI software
The 3DSI software cooperates with the machine tool probe of Marposs to make the CNC machine tool both a processing device and a testing device. This is very convenient for large parts, no need to move the parts to the three measuring machine, and there is no problem of secondary loading; 3DSI also Bringing the gospel to surface measurement, in order to measure the point to be measured and correct the radius of the probe on the surface, you must know the normal direction of the measured point and approach the measured point along the normal. Manually compiling the corresponding program is very complicated. Now you can use 3DSI software to automatically calculate the normal direction and generate a measurement program that is close to the normal. You can give the actual surface contour data or the probe ball center data as needed. Difficult surface measurement problems. The use of 3DSI software makes CNC machine tools not only as processing equipment, but also as a means of final inspection, especially popular with large parts users.

Figure 2 3DSI software interface
This article was issued by the Journal of Mechanical Workers (Cold Processing) in the 11th issue of 2006, so stay tuned!
Copyright, without written permission , may not be reproduced!
Wpc Others(Bench,Dustbin,Garden Pot)
Wpc Bench,Street Furniture,Outdoor Wood Bench
Yongsheng New Material Co., Ltd. , http://www.wpcgoods.com