Zhang Liang, who loves CAD design and production. In 2006, he began to use Zhongwang CAD to learn mechanical drawing, and then contacted Zhongwang 3D. Through Zhongwang 3D efficient hybrid modeling kernel, easy to learn and easy to use, and shared a lot of high-quality 3D CAD design works with members of Zhongwang Technology Community, helping other members to broaden 3D CAD design ideas and improve 3D CAD design capabilities.
Zhongwang 3D2012's unique hybrid modeling technology enables efficient CAD surface design and pioneers CAD product design ideas. Today I mainly share with you how to use the Zhongwang 3D2012 to draw a beautiful colorful gourd, first introduce the main CAD modeling ideas.
First, make a gourd-shaped body, then trim it by rotating 360 degrees, split it into one-seventh piece, and then divide the piece into a circular array to re-form a gourd. This hoist is made up of seven pieces, and the seven pieces are filled in seven colors to complete. The specific CAD design practices are as follows:
The first step is to make a gourd body.
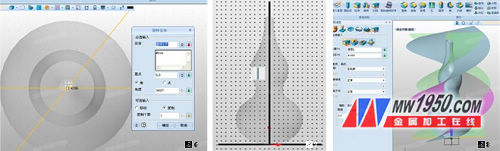
Insert a sketch in the XZ plane, draw a sketch (Figure 1), connect the circle and two ellipses with two arcs, and use the constraint tangency to ensure tangency between the curves (Figure 2). The size is not strictly required, as long as it can form a gourd-shaped outline.

Then, the trimming is performed to present the shape as shown in Fig. 3. After trimming, the whole image is moved upwards so that the bottom of the hoist is at the origin of the coordinates (Fig. 4), which facilitates the rotation of the dots. Exit the sketch, contoured in Figure 4, with the straight edge (or Z axis) as the axis and rotate it into the body of the hoist (Figure 5).

The second step is the practice of rotating the plane.
Insert a sketch in the XY plane, make a horizontal straight line through the origin of the coordinate, and the two ends of the straight line should exceed the shape of the gourd, and then use this line as the base point (this point must be at the dot, otherwise, it is formed by seven arrays. The hoist can't match), rotate the 360/7 degree angle and keep the original line (check copy). The angle is a corner that divides 360 degrees into seven parts. It is an infinite number of decimals, but Zhongwang 3D2012 can input calculation formulas in the numerical input field, which brings great convenience and flexibility to the design (Figure 6).
Exit the sketch, then insert the sketch into the XZ plane and do the sweep path P2. Note that the length of the path is slightly higher than the hoist. If it is low, the trimming cannot be successful, and the path must be from the dot, vertically upward. Otherwise, the cut out of the one-seventh hoist array does not match (Figure 7).
The sweep setting is shown in Figure 7. Note that the base is selected, and the addition, subtraction, and intersection operations cannot be selected. The contour is the two intersecting lines, the path is a vertical straight line, then select the Distort tab in the Advanced tab, and select Linear in the Distort tab. The angle of the distortion is from 0.00 to 360. The result is shown in Figure 8.
The third step is to trim and array.
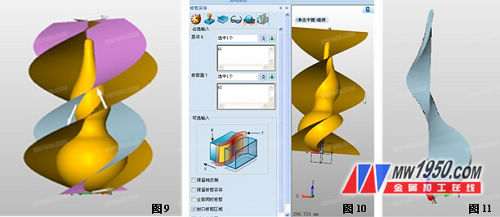
Click the trim command, the base of the repair is the hoist, the trimming surface is one of the rotating surfaces, the optional input check the trimming area, retain the smaller solids of the two rotating surfaces, and trim again, as shown in Figure 9, Figure 10. The final result is shown in Figure 11.
Click the Array command, the array is set as shown in the figure, and the circular array is selected. The number is 7 and the angle is 360/7. In Zhongwang 3D2012, it is very convenient to fill in the formula without calculating the angle by yourself. The result is shown in Figure 12.
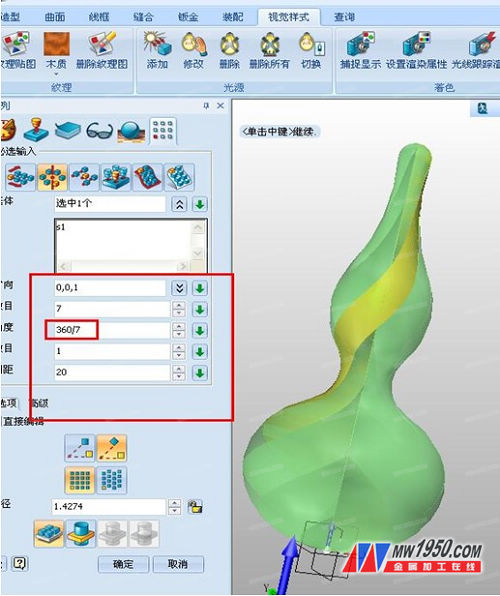
Figure 12
The fourth step is to choose a visual style to fill the colorful gourd.
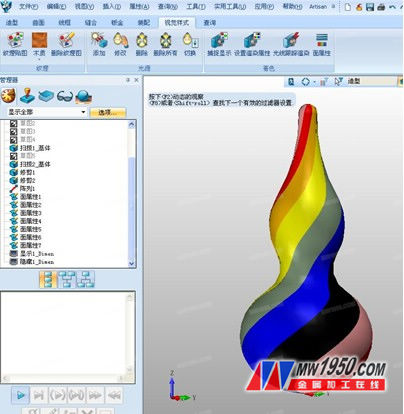
The seven-and-a-half hoist has been formed, and the next seven colors will be added separately. Click on the visual style and set it in the polygon properties (Figure 13), adding colors to each block in turn. With a simple and efficient 3D CAD design, the beautiful colorful gourd is complete! You also try to draw one!

Figure 13
Colorful hoist effect picture
Potassium Metaphosphate,Tetrapotassium Pyrophosphate,Industry Grade Tetrapotassium Pyrophosphate
Emulsifier,Acidity Regulator Co., Ltd. , http://www.nutrition-enhancer.com